- Emily Albert

- Oct 30, 2022
- 2 min read
Painting Pumpkins has been around for a few years now but it seems as if it has taken over! I notice people painting more than carving now! Although carving will always be a beloved tradition. Let me walk you through the pumpkin paintings I created this year!

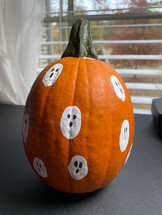
The first one we have is a Ghost finger-painting pumpkin. I started by picking out a pumpkin, I chose a small one! Then I collected my supplies, such as white paint, black paint, a paintbrush, and a cloth for cleaning.
I then dipped my thumb into the white paint and created fingerprints all over the pumpkin to resemble ghosts!
Taking the paintbrush, I dipped it into the black paint and make three strikes on each ghost, to make the eyes and mouth on each one. That's all it takes for this simple design. This one is the best option for kids!

I chose to be a little bit more elaborate with this pumpkin painting. I created a retro-style pumpkin, so let me walk you through the How-To!
I picked a pumpkin, paintbrushes, and a few different colors of paint.
I started by painting the entire pumpkin with that vibrant blue paint. Once the pumpkin is covered, let's start on the patterns.
I took a teal paint and first added the three-lined patterns around the pumpkin. Don't add too many because the different shapes will fill the pumpkin canvas as we paint!
Now, let's add the red triangles. Then, the little orange C's all around. Lastly, add little pink ghost shapes and using the same original blue color, make the faces. That's it! Not hard at all!
These pumpkin paintings are very easy for beginners!
Subscribe for More!


Comments